Gitlab安装和使用
一、 简介
GitLab,是一个利用 Ruby on Rails 开发的开源应用程序,实现一个自托管的Git项目仓库,可通过Web界面进行访问公开的或者私人项目安装。
它拥有与GitHub类似的功能,能够浏览源代码,管理缺陷和注释。可以管理团队对仓库的访问,它非常易于浏览提交过的版本并提供一个文件历史库。
团队成员可以利用内置的简单聊天程序(Wall)进行交流。它还提供一个代码片段收集功能可以轻松实现代码复用,便于日后有需要的时候进行查找。
二、 安装
CE版
1.下载gitlab安装包
官网下载速度较慢 建议先行下载
(1).https://about.gitlab.com/downloads/
(2).国内的源 里面可以找到最新的版本https://mirrors.tuna.tsinghua.edu.cn/gitlab-ce/ubuntu/pool/trusty/main/g/gitlab-ce/
2.安装依赖
sudo apt-get install curl openssh-server ca-certificates postfix3.配置postfix邮箱
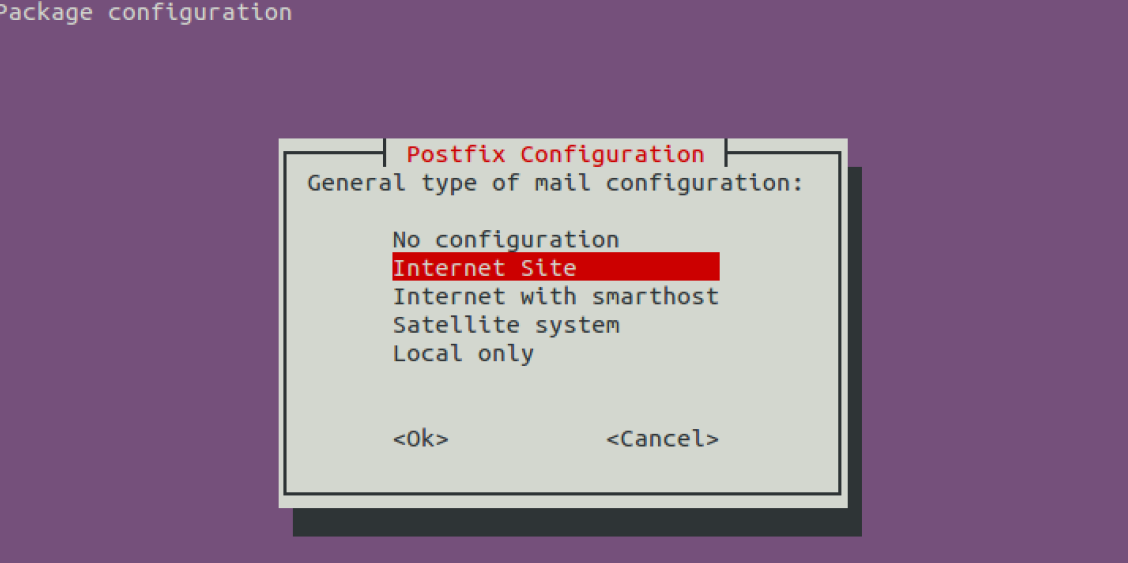
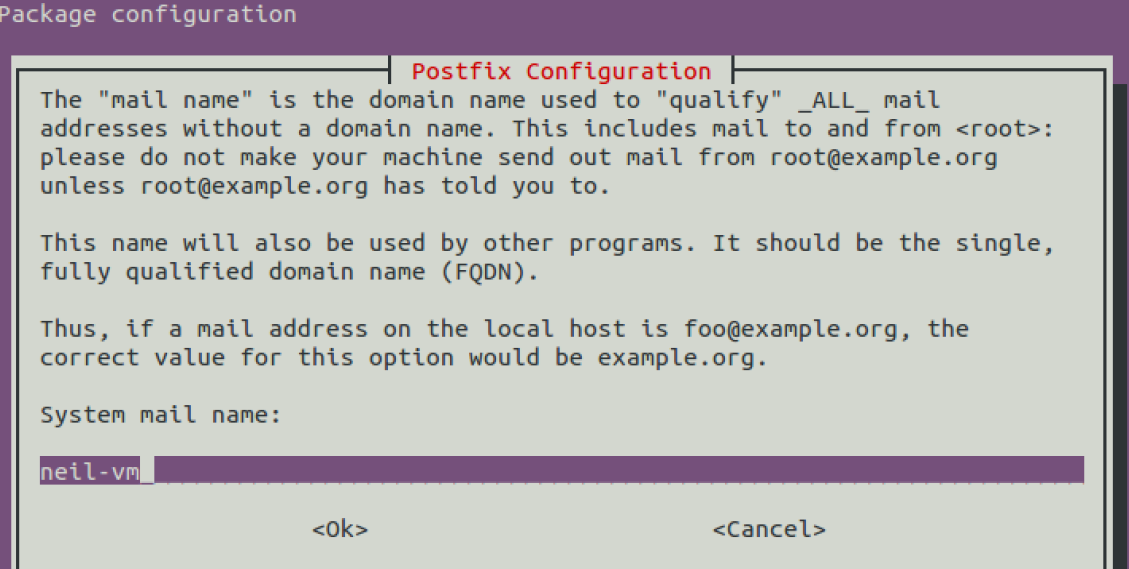
选择 Internet Site (F12) Enter 下一步
这里设置FQDN 使用默认即可(?)
4.安装gitlab安装包
sudo dpkg -i gitlab-ce_7.10.5~omnibus-1_amd64.debPS:
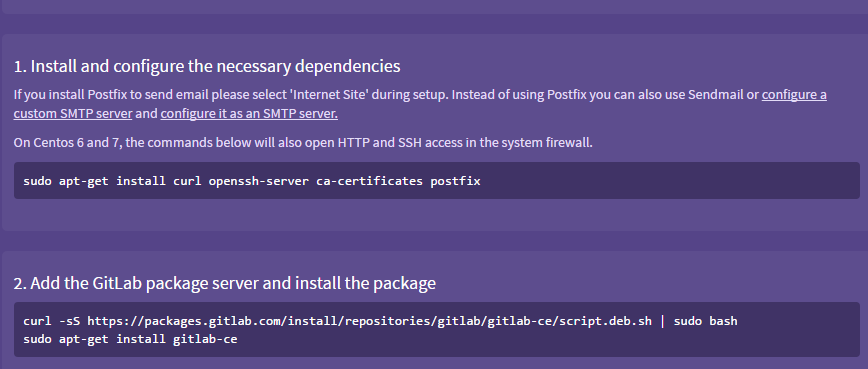
官网配置到这里。
出现 It looks like… 表示安装成功!
5.配置 gitlab
这一步在官方的文档里面没有,但是如果没有配置的话,直接启动GitLab,会出现不正确的FQDN错误,导致无法正常启动。因此必须做配置。
sudo mkdir -p /etc/gitlab
sudo touch /etc/gitlab/gitlab.rb
sudo chmod 600 /etc/gitlab/gitlab.rb
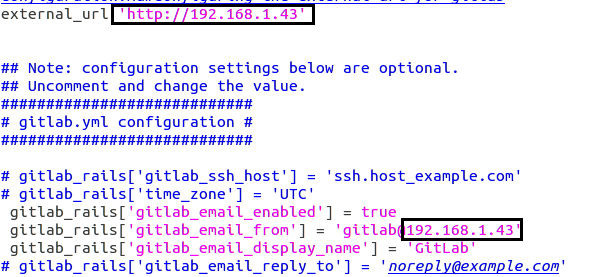
sudo gedit /etc/gitlab/gitlab.rb
把external_url改成部署机器的域名或者IP地址。
6.对GitLab进行重配置 (这一步也是启动 GitLab)
sudo gitlab-ctl reconfigure7.查看启动状态
sudo gitlab-ctl status8.打开浏览器登陆
按照上面设置的external_url访问,第一次登陆默认管理员密码和用户名:
Username: root
Password: 5iveL!fe
登陆进去可做修改
第一次启动的时候,需要初始化大量的东西,经常会出现502错误,通常是由于内存不足的原因导致,所以需要准备好足够的内存。官方推荐生产环境中使用2G内存,2核CPU。虚拟机中测试1GB内存基本就可以了。
三、使用
以管理员账户登陆为例
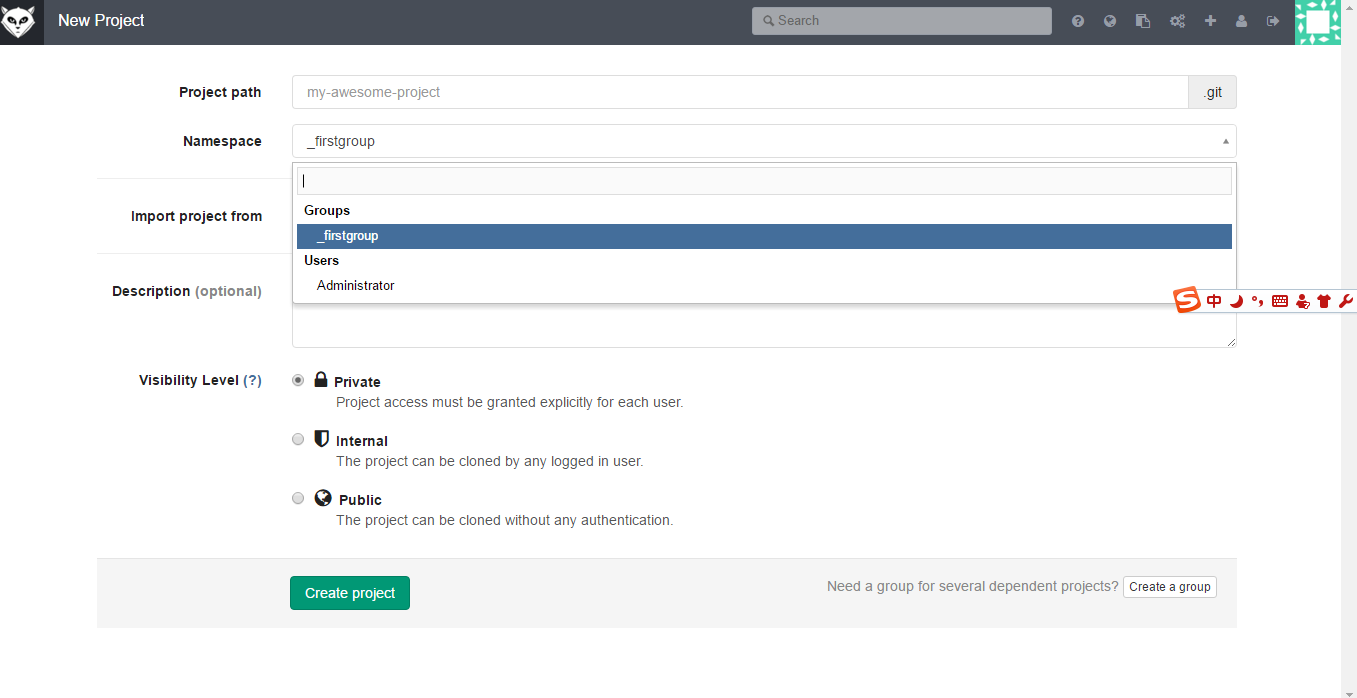
1.创建新的工程
Namespace:
这个选择是用来决定这个工程所属的,可以选Users,或者选择Groups,这个会影响到后面工程的url。
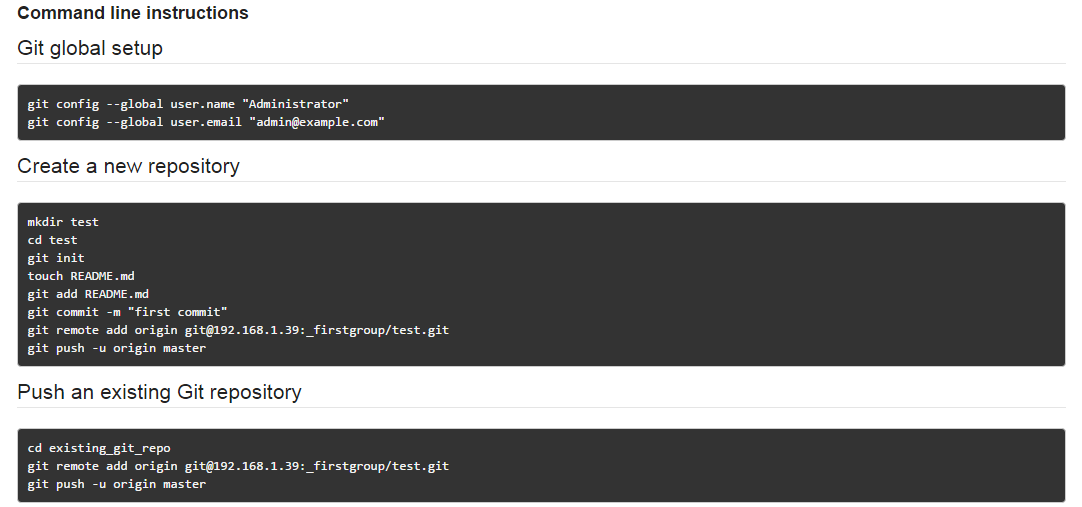
例如我选择了组_firstgroup创建工程test、 那么这个工程就会在这个组内可见,那么访问路径是https://domain.com/_firstgrop/test.
权限等级分三种:
Private 私有的,只有你自己或者组内的成员能访问
Internal 所有登录的用户
Public 公开的,所有人都可以访问
2.对项目进行设置
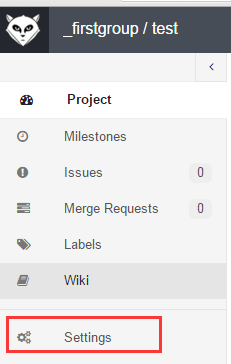
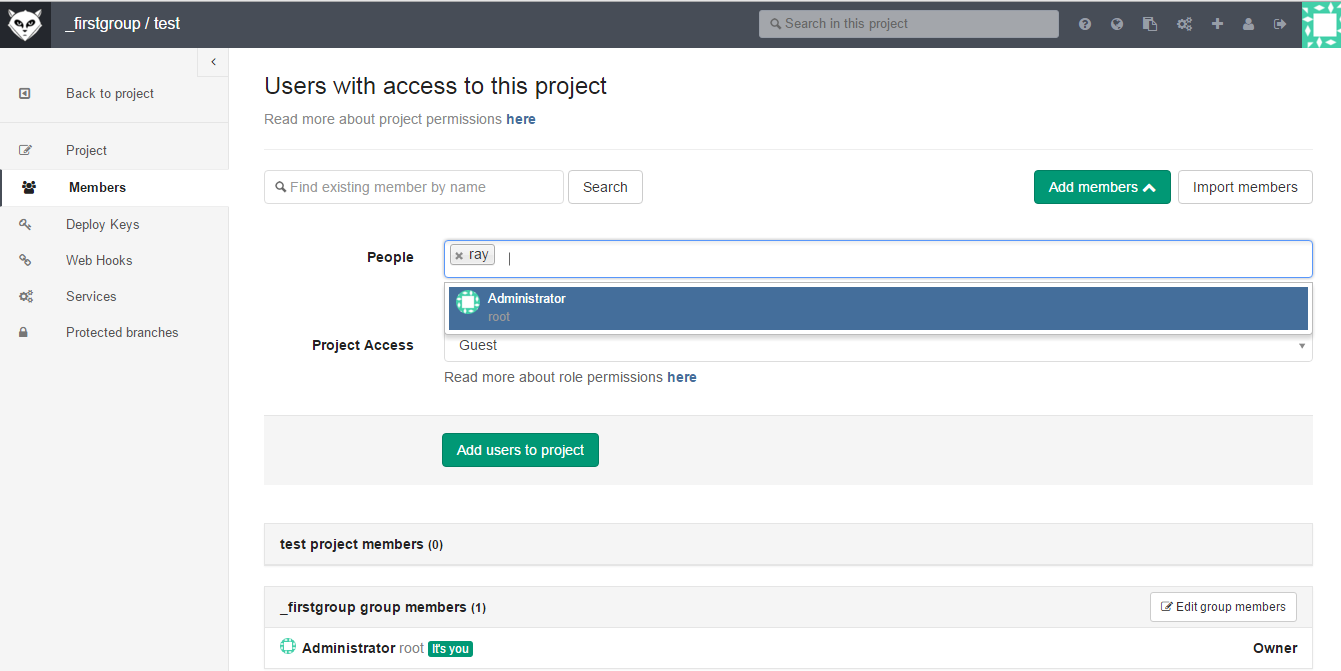
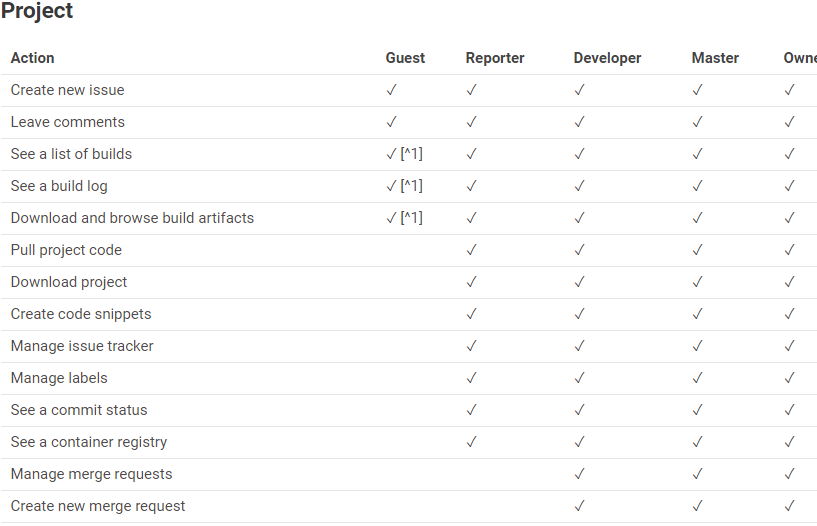
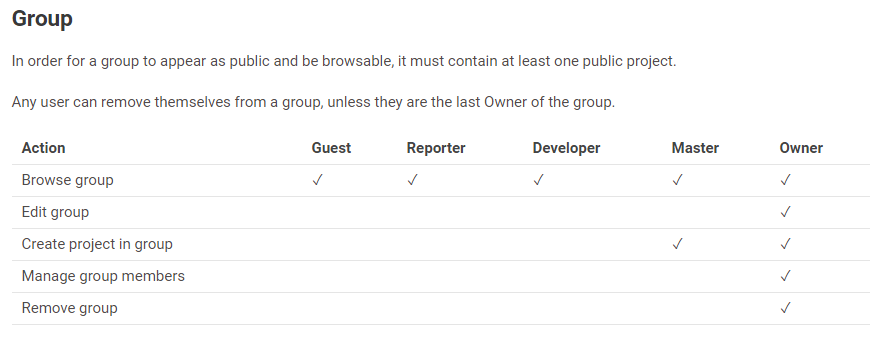
设置用户权限
Invite people using their e-mail address
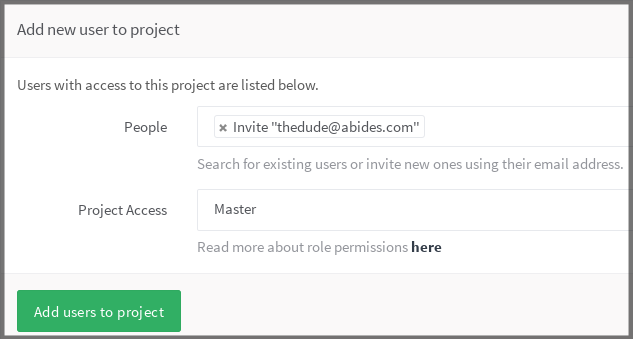
权限
- Project
- Group
- External Users
Project
Group
External Users
In cases where it is desired that a user has access only to some internal or private projects, there is the option of creating External Users. This feature may be useful when for example a contractor is working on a given project and should only have access to that project.
External users can only access projects to which they are explicitly granted access, thus hiding all other internal or private ones from them. Access can be granted by adding the user as member to the project or group.
Git的使用
1 添加sshkey
git仓库之间的代码传输协议主要使用ssh协议。而一般搭建gitlab的时候使用的git用户是没有密码的,因此直接ssh是不能登录的,就需要使用ssh-keygen上传公钥,使用非对称加密传输。下面讲述如何上传你的ssh公钥:
(1).生成sshkey
在终端中敲下面的命令,第一步会生成一对私钥和公钥,分别存在 ~/.ssh/id_rsa和~/.ssh/id_rsa.pub中。第二步查看公钥字符串。
ssh-keygen -t rsa -C "$your_email"
cat ~/.ssh/id_rsa.pub
如果是在Windows下可以使用Git工具生成

这里使用的是Git Bash 下载地址:https://git-scm.com/downloads
$your_emai是你的邮箱地址,一直回车即可,此命令在C:\Users\<你的用户名>.ssh目录下生成一对公私密钥,拷贝公钥(.pub结尾的文件)的内容,如我的id_rsa.pub:
(2).保存sshkey到gitlab
登陆你的GitLab账号之后,点击右上角的”Profile Setting” -> “SSH Keys”,输入SSH Key标题(可自定义),将拷贝的id_rsa.pub内容拷贝到Key中,”Add Key”即可。

next
2 开始上传代码
- 进入工程目录 cd $project_root
- 初始化git仓库 git init
- 添加文件到仓库 git add .
- 提交代码到仓库git commit -m ‘init commit’
- 链接到git server git remote add origin
git@example.com:namespace/projectname.git - push代码到服务器 git push origin master
这是之前新建的项目
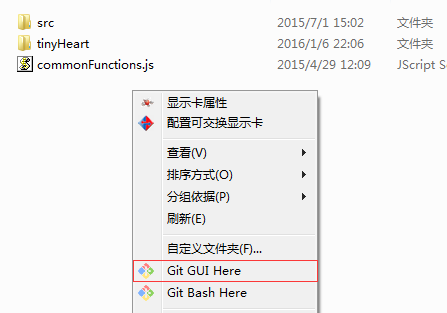
如果安装了Git 直接在项目文件夹下 右击Git Bash here
上传成功
**
Question:
**
Email 问题:
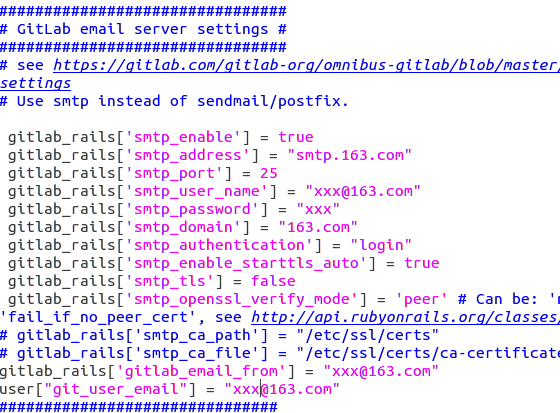
1. GitLab新增用户使用postfix 发送本地邮件,不配置SMTP服务。
(注:重配postfix :sudo dpkg-reconfigure postfix 或者
sudo vi /etc/postfix/main.cf)
查看postfix 邮件发送日志:
sudo vi /var/log/mail.log- 配置SMTP 发送邮件
sudo gedit /etc/gitlab/gitlab.rb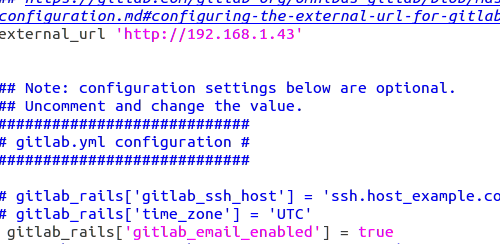
**
GitLab一些常用指令
:**
**
GitLab 启动 停止
**:
1.Start all GitLab components
sudo gitlab-ctl start2.Stop all GitLab components
sudo gitlab-ctl stop3.Restart all GitLab components
sudo gitlab-ctl restartGitLab使用gitlab-ctl日志查看的方法
Gitlab 默认的日志文件存放在/var/log/gitlab 目录下
1.查看所有日志
sudo gitlab-ctl tail2.查看nginx 访问日志
sudo gitlab-ctl tail nginx/gitlab_acces.log3.查看 postgresql 日志
sudo gitlab-ctl tail postgresql维护
1.GitLab 仓库:
1.1 搜索git_data_dir
sudo vi /etc/gitlab/gitlab.rb
/git_data_dir
搜索到缺省路径: git_data_dir “/var/opt/gitlab/git-data”
需要su权限进入 git-data
sudo su
cd git-data
cd repositories
2.GitLab Backup
创建GitLab系统的备份
create a GitLab backup task
# use this command if you've installed GitLab with the Omnibus package
sudo gitlab-rake gitlab:backup:create
Also you can choose what should be backed up by adding environment variable SKIP. Available options: db, uploads (attachments), repositories, builds(CI build output logs), artifacts (CI build artifacts), lfs (LFS objects). Use a comma to specify several options at the same time.
sudo gitlab-rake gitlab:backup:create SKIP=db,uploadsUpload backups to remote (cloud) storage
Starting with GitLab 7.4
For omnibus packages:
gitlab_rails['backup_upload_connection'] = {
  'provider' => 'AWS',
  'region' => 'eu-west-1',
  'aws_access_key_id' => 'AKIAKIAKI',
  'aws_secret_access_key' => 'secret123'
}
gitlab_rails['backup_upload_remote_directory'] = 'my.s3.bucket'
Uploading to locally mounted shares
Using the Local storage provide
挂载U盘或其他设备
查看设备:
cat /proc/partitions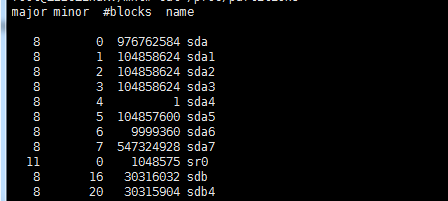
我的设备时 sdb4
在mnt下新建backups ,然后
sudo mkdir backups
sudo chown gitlab:gitlab backups
mount /dev/sbd1 /mnt/backups -o uid=1000,gid=1000
/dev/sdb1指的是U盘,/mnt/backups是挂载的地方.
如果是fat16就使用下面的命令
mount -t msdos /dev/sdb4 /mnt/usb
如果是fat32
mount -t vfat /dev/sdb4 /mnt/usb
如果是ext2格式,就用命令:
mount -t ext2 /dev/sda4 /mnt/usb
1.加挂FAT32文件系统
最简单的用法
mount /dev/hda6 /mnt/d
如果当前U盘已经挂载,
umount /dev/sdb1 ### or umount /media/disk which is the samesdb1 是你的U盘
cd /mnt/usb即可看见u盘文件
For omnibus packages:
gitlab_rails['backup_upload_connection'] = {
  :provider => 'Local',
  :local_root => '/mnt/backups'
}

# The directory inside the mounted folder to copy backups to
# Use '.' to store them in the root directory
gitlab_rails['backup_upload_remote_directory'] = 'gitlab_backups'
Backup archive permissions
The backup archives created by GitLab (123456_gitlab_backup.tar) will have owner/group git:git and 0600 permissions by default. This is meant to avoid other system users reading GitLab’s data. If you need the backup archives to have different permissions you can use the ‘archive_permissions’ setting.
# In /etc/gitlab/gitlab.rb, for omnibus packages
gitlab_rails['backup_archive_permissions'] = 0644 # Makes the backup archives world-readable
Backup and restore omnibus-gitlab configuration
refer :
https://gitlab.com/gitlab-org/omnibus-gitlab/blob/master/doc/settings/backups.md
It is recommended to keep a copy of /etc/gitlab, or at least of /etc/gitlab/gitlab-secrets.json, in a safe place.
All configuration for omnibus-gitlab is stored in /etc/gitlab. To backup your configuration, just backup this directory.
# Example backup command for /etc/gitlab:
# Create a time-stamped .tar file in the current directory.
# The .tar file will be readable only to root.
sudo sh -c 'umask 0077; tar -cf $(date "+etc-gitlab-%s.tar") -C / etc/gitlab'
Error
1.NoMethodError: undefined method `files’ for nil:NilClass
gitlab:backup:create fails when ‘backup_upload_remote_directory’ doesn’t exist
参考 :
1.官方安装:https://about.gitlab.com/downloads/#ubuntu1404
2.GitLab Documentation :http://docs.gitlab.com/ce/
3.Postfix邮箱配置指南:
http://wiki.ubuntu.org.cn/Postfix#Postfix_.E5.9F.BA.E6.9C.AC.E8.AE.BE.E7.BD.AE.E6.8C.87.E5.8D.97
4.Ubuntu 14.04下安装GitLab指南:http://www.open-open.com/lib/view/open1433584757328.html
5.GitLab的使用:
https://blog.cnbluebox.com/blog/2014/04/15/gitlabde-shi-yong/
6.
http://docs.gitlab.com/ce/raketasks/backup_restore.html
https://www.icicletech.com/blog/gitlab-backup-made-easy
8.GitLab High Availability
https://about.gitlab.com/high-availability/
更多推荐
 已为社区贡献1条内容










所有评论(0)